How to Set Up a VPN on an iPhone (iOS): The Complete Step-by-Step Guide
Updated for iOS 27: install from the App Store, find every VPN setting under VPN & Device Management, decide whether you need one at all, and fix the two problems every iPhone user hits — disconnects and "connected but no internet."

vpnrank.io is reader-supported: we may earn a commission if you buy through links in this article. This never affects our rankings.
To set up a VPN on an iPhone (iOS 27, October 2026), install your provider's app from the App Store, sign in, tap Connect, then tap Allow when iOS asks to add VPN configurations. The VPN then appears in Settings › General › VPN & Device Management, where you can also add one by hand: the built-in iOS client supports IKEv2, IPsec and L2TP.
When the tunnel is up, a VPN icon appears in the status bar, which Apple defines as the iPhone being connected to a network using VPN; on Face ID models some status icons only show at the top of Control Center. Do you need a VPN at all? Not for everything. iOS already uses a private hardware address on each Wi-Fi network, and iCloud+ Private Relay hides your IP address from websites in Safari. A VPN is what covers every app and lets you choose the country, which is why it matters on public Wi-Fi and when you travel.
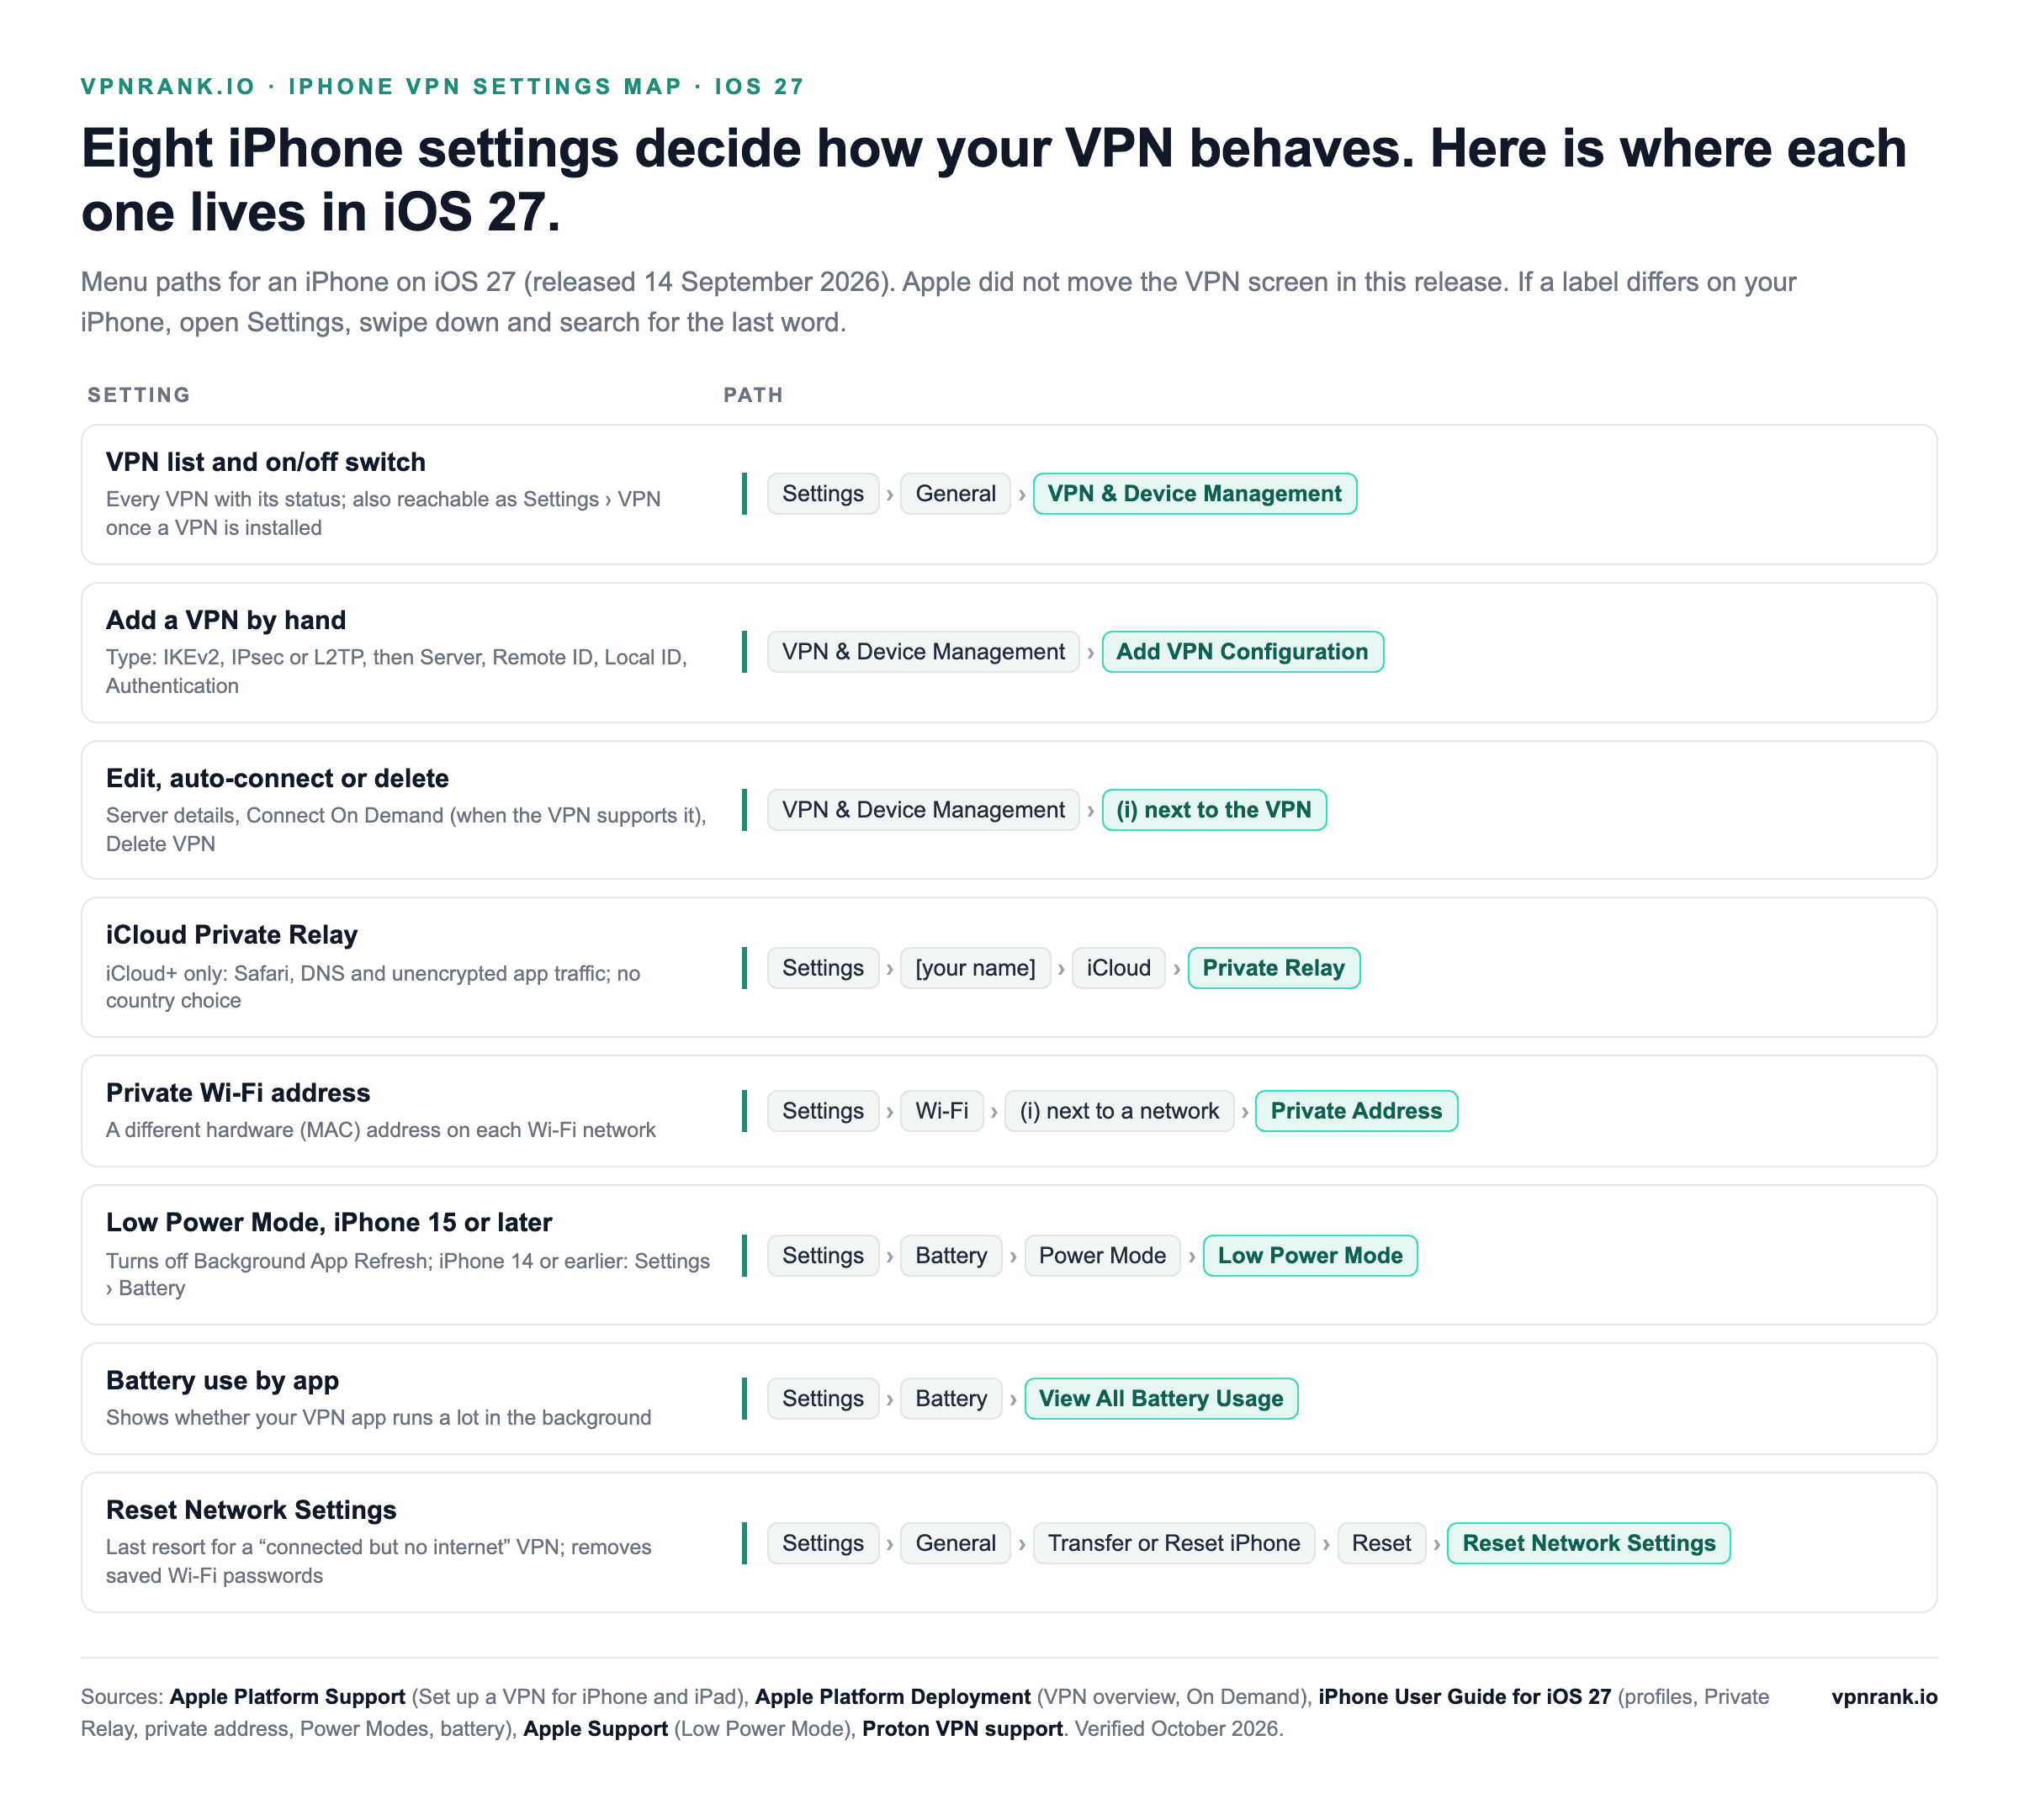
In iOS 27, every VPN lives under Settings › General › VPN & Device Management
Apple did not move the VPN screen in iOS 27, which it released on 14 September 2026 (the current update, iOS 27.0.1, followed on 28 September). The iOS 27 edition of the iPhone User Guide still lists installed profiles under Settings › General › VPN & Device Management, and Apple's own guide to setting up a VPN on iPhone and iPad uses the same path to add, change and remove a VPN. The only VPN item in Apple's enterprise notes for iOS 27 is aimed at IT departments: new declarative device-management configurations for VPN, DNS and relays.
Once a VPN configuration exists, iOS also shows a VPN entry in the main Settings list; Proton VPN's iPhone support guide sends users there (Settings › VPN) to view or delete configurations, and it opens the same list. If you can't find either, use Apple's own tip: open Settings, swipe down to reveal the search field, and search for "VPN".
| Setting | Where it is in iOS 27 | What it does | Source |
|---|---|---|---|
| VPN list and on/off switch | Settings › General › VPN & Device Management (also Settings › VPN once a VPN is installed) | Shows each VPN service with its status; Connect or Disconnect turns it on or off | Apple Platform Support; Proton VPN support |
| Add VPN Configuration | Same screen › Add VPN Configuration | Builds a manual IKEv2, IPsec or L2TP connection from details you were given | Apple Platform Support |
| Info (i) button | Tap (i) next to a VPN | Edits Server, Account, Password, Remote ID, Local ID and Authentication; Delete VPN removes it | Apple Platform Support |
| Connect On Demand | Tap (i) next to a VPN that supports On Demand rules | Starts the VPN automatically by rule, for example when the iPhone joins an unknown Wi-Fi network | Apple Platform Deployment |
| Configuration profiles | Settings › General › VPN & Device Management | Work or school profiles; deleting one also deletes its settings, apps and data | iPhone User Guide (iOS 27) |
| iCloud Private Relay | Settings › [your name] › iCloud › Private Relay | iCloud+ relay for Safari, DNS lookups and unencrypted app traffic; no country choice | Apple Support; iPhone User Guide |
| Limit IP Address Tracking | Settings › Wi-Fi › (i) next to a network, or Settings › Cellular › Cellular Data Options | Turns Private Relay on or off for that network | iPhone User Guide (iOS 27) |
| Private Wi-Fi Address | Settings › Wi-Fi › (i) next to a network › Private Address | Uses a different hardware (MAC) address on each Wi-Fi network | iPhone User Guide (iOS 27) |
| Low Power Mode | iPhone 15 or later: Settings › Battery › Power Mode › Low Power Mode. iPhone 14 or earlier: Settings › Battery › Low Power Mode | Reduces background activity and turns off Background App Refresh | Apple Support |
| Reset Network Settings | Settings › General › Transfer or Reset iPhone › Reset › Reset Network Settings | Resets network settings and removes all saved Wi-Fi passwords | Apple Platform Support |
Where each VPN-related setting lives on an iPhone running iOS 27. Sources: Apple Platform Support, Apple Platform Deployment, the iPhone User Guide for iOS 27, Apple Support and Proton VPN support. Verified October 2026.
iOS runs a VPN in two ways, and only the app route gets WireGuard
Apple's deployment guide describes both routes. The first is a built-in client for standard protocols. The second is the Network Extension framework, which lets VPN providers build their own apps. Almost everyone should use a provider's app, but knowing why the built-in client exists saves confusion when a settings screen asks for a server address and a remote ID.
Method 1: the provider app (recommended)
When you install a VPN app, it registers its own VPN configuration with iOS. You never type a server address or a key: the first time you connect, iOS asks whether the app may add VPN configurations, and after that the app handles servers, protocols and reconnection. This is how the vast majority of iPhone users should set things up, and it's what all of the VPNs for iPhone we rank are built around.
Method 2: the built-in iOS VPN client (manual)
iOS also ships a native client. Apple lists three connection types for it on iPhone and iPad: IKEv2, IPsec and L2TP. You fill in a server, remote ID and credentials or a certificate by hand. It's meant for company networks and self-hosted servers, not commercial VPN services: there is no WireGuard and no OpenVPN in the list. One recent change is worth knowing if you run your own server: since iOS 26, Apple says IKEv2 connections can be configured to add ML-KEM key exchanges for quantum security.
Do you need a VPN on your iPhone? Only for what iOS doesn't already cover
You don't need a VPN for everything on an iPhone, but you do need one for a few things iOS can't do on its own. iOS already uses a different private hardware address on every Wi-Fi network it joins. With an iCloud+ subscription, Private Relay also hides your IP address from websites in Safari and encrypts your DNS lookups. Neither of these sends every app's traffic through a server you choose. That is a VPN's job: on public Wi-Fi you don't control, abroad when you need your home-country apps, or when you want every app, not just Safari, to stop seeing your real IP address.
- Worth it: hotel, airport and café Wi-Fi run by people you don't know; travel, when streaming and banking apps expect you to be at home; and any time you want apps other than Safari to stop seeing your real IP address.
- Probably not needed: at home on your own Wi-Fi, if all you want is private browsing in Safari and you already pay for iCloud+. Private Relay covers that wherever Apple offers it.
- Not a fix for: tracking by accounts you're signed in to. A VPN changes your IP address, not who you are to an app you've logged into, so treat it as one layer of your privacy setup, not the whole thing.
iCloud Private Relay vs a VPN on iPhone
| iCloud Private Relay | VPN app | |
|---|---|---|
| Cost | Included with an iCloud+ subscription | A separate subscription (Proton VPN also has a free plan for one device) |
| Traffic covered | Safari browsing, DNS lookups and unencrypted (http) app traffic | The traffic the app routes through its tunnel, normally every app |
| What websites see | A temporary address from Apple's second relay | The VPN server's address |
| Who sees your real IP | Your network provider and Apple's first relay | Your network provider and the VPN provider |
| Choose a country | No: only Maintain General Location or Use Country and Time Zone | Yes, from the provider's server list |
| Availability | Not available in all countries or regions | Depends on the provider |
| Where to turn it on | Settings › [your name] › iCloud › Private Relay | Install the app, tap Connect, then Allow |
Sources: Apple Support (About iCloud Private Relay), the iPhone User Guide for iOS 27, Apple Developer (Prepare your network for iCloud Private Relay), Proton VPN. Verified October 2026.
Apple documents one side effect worth knowing before you blame a VPN for slow results: Private Relay sends your browsing over a single connection, so speed tests that open several connections at once can show lower numbers while it's on, even though browsing itself stays fast. Our guide to how much a VPN slows your internet covers what a normal VPN speed loss looks like.
Getting a VPN on iPhone from the App Store takes five steps
For nearly everyone, this is the whole job: pick a provider, install its app, sign in and approve one prompt. iOS writes the VPN configuration for you, so it shows up in Settings afterwards, but you'll rarely need to look there again.
- 1Open the App Store, search for your provider's name and tap Get. Check that the developer name matches the company, so you don't install a copycat.
- 2Open the app and sign in with the account you created on the provider's website (or subscribe inside the app).
- 3Tap Connect. The first time, iOS asks for permission for the app to add VPN configurations and warns that activity on the iPhone may be filtered or monitored when using VPN. Tap Allow, and enter your passcode if iOS asks for it. If you tap Don't Allow, the app asks again every time you try to connect.
- 4Look for the VPN icon in the status bar, or at the top of Control Center on Face ID models. That's iOS confirming the tunnel is up.
- 5To pick a country, choose a server in the app before you connect. To switch the VPN off, tap Disconnect in the app or turn off the switch under Settings › VPN.
The warning in that prompt sounds alarming. Proton VPN's support page explains it plainly: it's technically true of every VPN, because your traffic passes through the provider, which is exactly why the provider you choose matters. If your iPhone is managed by an employer or school, an administrator may need to allow VPN configurations before the prompt works at all.
The VPN icon tells you a tunnel exists, not that nothing leaks around it. After connecting, check your visible address with our VPN test and run a WebRTC leak test. A DNS leak or a WebRTC leak is the usual way an apparently connected VPN still exposes your real location.
Adding a VPN manually: the fields iOS asks for
If you're connecting to a work network, a home server or a provider that gives out IKEv2 details, you can skip the app. Apple's advice is to get the connection type, server address, account name and password or certificate from the network administrator first. If you were sent a configuration profile instead, tapping it installs the connection for you. Otherwise:
- 1Open Settings › General › VPN & Device Management.
- 2Tap Add VPN Configuration and choose the Type: IKEv2, IPsec or L2TP. Use the one your administrator specifies; IKEv2 is the modern default.
- 3Fill in Description (any name), Server and, for IKEv2, the Remote ID and Local ID exactly as provided.
- 4Choose the Authentication type, then enter the User name and Password, or select a certificate installed with a profile.
- 5Tap Done, then turn on the VPN's switch to connect.
Changing or removing a VPN configuration
To edit a configuration, return to the same screen and tap the (i) button next to it. Apple lists Display Name, Server, Account, Password, Remote ID, Local ID and Authentication there. To remove one, tap (i), then Delete VPN, and confirm. Deleting an app's configuration is also the first fix for a VPN that says it's connected but passes no traffic: the app asks to add it again the next time you connect.
One limit is worth stating plainly: the built-in client can't run WireGuard or a provider's own protocol. If your service is WireGuard-based, as many now are, the manual route won't work and you need its app. That's one reason we steer most readers to the app method in our VPN buyer's guide.
WireGuard or IKEv2: which protocol to pick on an iPhone
If your provider's app lets you choose a protocol (most hide it in settings), the choice matters more on a phone than on a laptop. iPhones switch constantly between Wi-Fi and cellular and drop in and out of sleep. The right protocol keeps the tunnel stable through all of that; the wrong one causes exactly the drops covered later in this guide.
- WireGuard is the usual default in provider apps. It's lean and reconnects quickly, but the built-in iOS client can't run it, so you only get it through an app. Some providers ship their own version: NordVPN says its NordLynx protocol is built on WireGuard.
- IKEv2 is the strongest native option and suits phones well. Apple lists MOBIKE among its IKEv2 features: that's the extension, defined in RFC 4555, that lets a VPN client keep its connection when its IP address changes, which is exactly what happens when an iPhone moves from Wi-Fi to cellular.
- Lightway is ExpressVPN's own protocol. It's built on the wolfSSL cryptography library, not on WireGuard, and you select it inside the ExpressVPN app.
- IPsec and L2TP are the legacy options. They're still in iOS for company and self-hosted servers, but give consumers nothing over the options above.
The practical rule: leave the app on its default WireGuard-family or modern protocol, and only switch to IKEv2 if a particular network keeps blocking or throttling the connection. If both fail on the same network, the network is probably filtering VPN traffic, and a mode with obfuscation or a different port may be the only way through. You can see how much speed each provider keeps in our VPN speed tests.
Connect On Demand turns the VPN on by rule; true Always On VPN is for managed iPhones
The biggest weakness of any VPN is memory: a tunnel you forgot to switch on protects nothing. iOS handles this with Connect On Demand, a rule-based feature that starts the VPN automatically under conditions you set, such as joining a Wi-Fi network you don't trust. It's the closest thing consumers get to always-on protection.
To use it, open Settings › General › VPN & Device Management, tap the (i) next to your VPN and turn on Connect On Demand. Apple's deployment documentation lists what On Demand rules can do: recognise an internal network where the VPN isn't needed, require the VPN when the iPhone joins an unknown Wi-Fi network, or start it when a lookup for a particular domain fails. Apple also notes that On Demand needs a login that doesn't ask you anything, such as a certificate. Most provider apps expose the same idea as an auto-connect setting, which is easier than writing rules. Common triggers include:
- Auto-connect on untrusted Wi-Fi, the most useful rule for anyone who uses café, airport or hotel networks.
- Auto-connect on cellular data, so mobile browsing is covered too.
- A trusted-network exception that lets the VPN stand down on your home Wi-Fi.
True Always On VPN is a separate, stricter mode for organisations. Apple's documentation says it works only with IKEv2, starts without any user interaction, stays on across restarts until the configuration is removed, and drops all traffic whenever the tunnel isn't up. Until iOS 27 it needed a supervised iPhone. The new declarative Always-on VPN configuration in iOS 27 removes that requirement, but it still has to come from a device-management service, through Device Enrollment or Automated Device Enrollment. For personal use, Connect On Demand plus the kill switch in most provider apps gets you close.
Per-app VPN and split tunneling on iOS are mostly for managed devices
A frequent question is whether you can route only some apps through the VPN, say a streaming app abroad while your banking app stays on your real connection. iOS is stricter here than Android, and what's possible depends on whether you use a provider app or a management profile.
- Consumer provider apps on a standard iPhone are generally all-or-nothing: everything goes through the VPN, or nothing does. Some add limited app-based rules, but support is uneven, so check the specific app.
- Per-app VPN is a formal iOS feature, but Apple's documentation says the app has to be managed by a device-management service. That's how companies route only their work apps through the office VPN.
- If you need to exempt one app, the practical workaround is turning the VPN off briefly, or using a provider that offers its own split-tunnel option on iOS.
Does a VPN drain your iPhone's battery? iOS shows you exactly how much
A VPN app keeps a tunnel open and encrypts what you send, so it uses some battery. How much depends on the app, the protocol and how much data you move, and you don't have to guess. Settings › Battery lists the apps and system activities using the most battery today, and View All Battery Usage breaks it down by day, including how long each app ran in the background. If your VPN app sits near the top while you're barely using the phone, try another protocol or turn off features you don't need.
The battery settings also explain some disconnects. Apple says Low Power Mode reduces background activity and turns off Background App Refresh. On iPhone 15 Pro and later, Adaptive Power is on by default on supported models, can limit background activity, and turns on Low Power Mode by itself when the battery drops below 20%. If your VPN only drops when the battery is low, that's the first thing to test.
Using an iPhone VPN while traveling or streaming
One of the most common reasons to put a VPN on a phone is to keep your usual apps working abroad. Streaming services and some banking and news apps check your location, and a VPN lets your iPhone appear to be back home. It's one use among several, next to privacy and public Wi-Fi safety.
If that's your goal, connect to a server in your home country before you open the app, and pick a provider with reliable mobile performance, because a slow tunnel makes video buffer. Our guides to the best VPNs for streaming and specific services like Netflix, HBO Max and BBC iPlayer cover which servers work. You can also check whether a show is available in your region before you travel, and sports fans heading abroad should read our sports streaming coverage.
Want an iPhone app that sets all of this up for you? See ExpressVPN, the top pick in our VPN ranking.
See our top-ranked VPNs →Troubleshooting: disconnects and the "no internet" problem
Two problems dominate iPhone VPN support: a tunnel that keeps dropping, and a connection that says it's active but loads nothing. Both are usually fixable in minutes, and they share a short list of causes: a stale configuration, iOS power-saving limiting background activity, or a protocol your current network dislikes. Apple's own first checks for connection problems involving VPN software are to confirm the date, time and time zone, install the latest software, restart the iPhone (and your router), and try a different network. Then work through these in order.
When the VPN keeps disconnecting
- 1Turn off Low Power Mode and see whether the drops stop. On iPhone 15 or later it's under Settings › Battery › Power Mode; on iPhone 14 or earlier, Settings › Battery. Apple says it turns off Background App Refresh while it's on.
- 2Allow the VPN app Background App Refresh and cellular data in its own settings.
- 3Switch protocol inside the app (try WireGuard, then IKEv2), since some networks throttle or block specific ones.
- 4Test on Wi-Fi and on cellular separately to see whether one network is the problem rather than the VPN.
- 5Update iOS and the app; connection-stability bugs are common and frequently patched.
When it connects but there's no internet
- 1Disconnect and reconnect to a different server; the one you're on may be overloaded or down.
- 2Delete the VPN configuration (Settings › General › VPN & Device Management › (i) › Delete VPN), restart the iPhone, then connect from the app again so it re-adds the configuration. A corrupt configuration is the classic cause of a "connected but dead" tunnel.
- 3Reset network settings via Settings › General › Transfer or Reset iPhone › Reset › Reset Network Settings. Apple warns this removes all Wi-Fi passwords, so have them handy.
- 4Turn off any DNS filtering or content-blocking features in the app. Apple lists content blockers among the kinds of security software that can block connections.
- 5If nothing works, search Settings for VPN, profile, firewall and filter (Apple's own tip) to find a leftover profile or filter from another app, and confirm you have data with the VPN off.
If drops continue after all of this, the provider may simply be slow or unstable on mobile. Compare raw performance in our VPN speed tests and prices in the live VPN price index before you renew, and if the VPN won't connect at all, our VPN won't connect guide walks through the checks layer by layer.
Beyond the iPhone: covering your other devices
Once your iPhone is set up, the natural next step is extending the same account to everything else you own. A single subscription usually covers several devices, and some setups protect gadgets that can't run a VPN app at all.
- Install the VPN on your router so every device on your network, including ones with no app support, is covered automatically; see our best VPN routers guide.
- For the living room, an Android TV VPN app handles streaming on the big screen.
- If cost is the concern, weigh the trade-offs in our free VPN for iPhone breakdown before assuming free is good enough.
Whichever way you go, the iPhone setup you just did is the template: install, allow one prompt, and let Connect On Demand keep it running. After that it's about choosing a provider fast and stable enough that you forget the VPN is there.
Every source behind this guide was re-read in October 2026
- Apple Platform Support — Set up a VPN for iPhone and iPad (connection types, menu paths, fields, Delete VPN, Reset Network Settings)
- Apple Platform Deployment — VPN overview for Apple device deployment (IKEv2 features incl. MOBIKE and ML-KEM, VPN On Demand, per-app VPN, Always On VPN)
- Apple Platform Deployment — Always-on VPN declarative configuration (iOS 27; requires supervision: no)
- Apple Platform Deployment — IKEv2 device management settings (Always On VPN, supervised)
- Apple Platform Deployment — VPN plugin declarative configuration (Connect On Demand toggle in Settings)
- Apple Support — What's new for enterprise in iOS 27 and Apple security releases (iOS 27 on 14 Sep 2026, iOS 27.0.1 on 28 Sep 2026)
- iPhone User Guide (iOS 27) — status icons, configuration profiles, iCloud Private Relay, private network address, Power Modes and battery usage
- Apple Support — About iCloud Private Relay and Apple Developer — Prepare your network or web server for iCloud Private Relay
- Apple Support — Use Low Power Mode to save battery life on your iPhone or iPad
- Apple Support — If your device has network connectivity issues, check for VPN and other third-party security software
- Proton VPN support — Allowing VPN configurations on your iPhone or iPad and Proton VPN free plan
- NordVPN — NordLynx protocol and ExpressVPN — Lightway
- RFC 4555 — IKEv2 Mobility and Multihoming Protocol (MOBIKE)
Frequently asked questions
Where are the VPN settings on an iPhone?
In iOS 27 they're under Settings > General > VPN & Device Management. That screen lists every VPN with its status and on/off switch, the Add VPN Configuration button for manual setup, and an (i) button next to each VPN for its server details, Connect On Demand and Delete VPN. Once a VPN is installed, iOS also shows a VPN entry in the main Settings list, which opens the same screen.
Do I need to configure anything in iOS settings, or does the app do it?
The app does it. The first time you tap Connect, iOS asks permission for the app to add VPN configurations; tap Allow. After that the VPN appears under Settings > General > VPN & Device Management, but you'll rarely need to open it. Manual setup is only for company or self-hosted servers that give you an IKEv2, IPsec or L2TP server address and login.
Do I need a VPN on my iPhone?
Not for everything. iOS already uses a private Wi-Fi address on each network, and iCloud+ Private Relay hides your IP address from websites in Safari. A VPN is worth it when you use public Wi-Fi you don't control, when you travel and need your home-country apps, or when you want every app, not just Safari, to stop seeing your real IP address. At home, for Safari-only privacy, Private Relay may be enough.
Is iCloud Private Relay the same as a VPN?
No. Private Relay is part of iCloud+ and covers Safari, DNS lookups and unencrypted app traffic, sending them through two relays so websites get a temporary address. It doesn't cover all app traffic, can't put you in another country (only a general location or your country and time zone), and isn't available in every country. A VPN routes all your apps through a server you choose.
How do I know the VPN is actually working on my iPhone?
Look for the VPN icon in the status bar, which Apple describes as the iPhone being connected to a network using VPN; on Face ID models, check the top of Control Center if it isn't shown. For proof, check your visible IP address with a VPN test or what-is-my-IP tool (it should show the VPN server's location) and run a WebRTC leak test.
Can I keep the VPN always on so I never forget to turn it on?
Yes, in practice. Turn on Connect On Demand (tap the (i) next to your VPN in Settings, or use your provider app's auto-connect setting) so it starts on untrusted Wi-Fi or cellular. Apple's stricter Always On VPN, which drops all traffic when the tunnel is down, is set by an organisation's device-management service and works only with IKEv2. iOS 27 no longer requires a supervised iPhone for it, but it still isn't a consumer toggle.
Why does my iPhone VPN keep disconnecting?
Start with Low Power Mode, which turns off Background App Refresh: on iPhone 15 or later it's in Settings > Battery > Power Mode, on iPhone 14 or earlier in Settings > Battery. On iPhone 15 Pro and later, Adaptive Power can switch it on by itself below 20% battery. Then allow the app background refresh, switch protocol (WireGuard, then IKEv2), update iOS and the app, and test Wi-Fi and cellular separately.
My VPN says it's connected but I have no internet — how do I fix it?
Switch to a different server first, since the one you're on may be overloaded. If that fails, delete the configuration (Settings > General > VPN & Device Management, tap (i), then Delete VPN), restart the iPhone and reconnect from the app. In stubborn cases, Reset Network Settings (Settings > General > Transfer or Reset iPhone > Reset) clears it; it removes saved Wi-Fi passwords, so have them ready.
Can I route only certain apps through the VPN on iPhone?
Usually not on a personal iPhone. Consumer VPN apps are generally all-or-nothing. iOS has a formal per-app VPN feature, but Apple's documentation says the apps must be managed by a device-management service, which is how companies route only their work apps. Some providers add their own split tunneling on iOS, so check the specific app if selective routing matters to you.
Can I set up a VPN on iPhone without downloading any app?
Yes, with the built-in client: Settings > General > VPN & Device Management > Add VPN Configuration. Choose IKEv2, IPsec or L2TP and enter the description, server, remote and local ID (for IKEv2), authentication type, user name and password from your administrator. It can't run WireGuard or providers' own protocols, so most commercial VPN services still need their app.
Does a VPN drain my iPhone battery?
It uses some, because the app keeps a tunnel open and encrypts your traffic, but how much depends on the app, protocol and data you use. Check Settings > Battery: it lists the apps using the most battery, and View All Battery Usage shows each app's background time by day. If your VPN app ranks high while you barely use the phone, try another protocol or turn off extra features.
Did iOS 27 change the VPN settings on iPhone?
Not for consumers. iOS 27, released on 14 September 2026, keeps VPNs under Settings > General > VPN & Device Management. Apple's iOS 27 changes are for managed devices: new declarative device-management configurations for VPN, DNS and relays, including an Always-on VPN configuration that no longer requires supervision.
How do I turn off or delete a VPN on my iPhone?
To turn it off, tap Disconnect in the VPN app or switch it off in Settings > VPN (or Settings > General > VPN & Device Management). To remove it, tap the (i) next to the VPN on that screen, then Delete VPN, and confirm. If Connect On Demand is on, turn that off too, or the VPN will reconnect by itself.
The best VPNs of 2026, ranked
Now you know how — here are the VPNs we recommend, independently tested and ranked for speed, streaming, privacy and value. Any of them works for everything in this guide.

ExpressVPN Ultra fast & secure. Great for privacy, downloads, and everyday browsing on all your devices. 24/7 live chat support.
ExpressVPN Ultra fast & secure. Great for privacy, downloads, and everyday browsing on all your devices. 24/7 live chat support.

IPVanish Fast speeds with unlimited device connections. Strong no-logs privacy and 24/7 live chat support. Great for families.

IPVanish Fast speeds with unlimited device connections. Strong no-logs privacy and 24/7 live chat support. Great for families.

NordVPN Excellent speeds with one of the largest server networks. Strong security features and easy-to-use apps. 24/7 live chat support.
NordVPN Excellent speeds with one of the largest server networks. Strong security features and easy-to-use apps. 24/7 live chat support.

Proton VPN Swiss-based VPN with strong privacy focus. Audited no-logs policy and open-source apps. Great for privacy-conscious users.
Proton VPN Swiss-based VPN with strong privacy focus. Audited no-logs policy and open-source apps. Great for privacy-conscious users.

CyberGhost Fast speeds and strong privacy tools. Simple apps, automatic WiFi protection, and 24/7 live chat support.
CyberGhost Fast speeds and strong privacy tools. Simple apps, automatic WiFi protection, and 24/7 live chat support.

TotalVPN Affordable VPN with strong privacy and reliable speeds. Easy-to-use apps for all major devices. No-logs policy.
TotalVPN Affordable VPN with strong privacy and reliable speeds. Easy-to-use apps for all major devices. No-logs policy.

Private Internet Access High-speed VPN with a large server network and advanced security settings. Ad blocker included and 24/7 live chat support.
Private Internet Access High-speed VPN with a large server network and advanced security settings. Ad blocker included and 24/7 live chat support.

Surfshark Unlimited device connections at a budget-friendly price. Includes ad blocker and strong privacy tools. Great value for money.
Surfshark Unlimited device connections at a budget-friendly price. Includes ad blocker and strong privacy tools. Great value for money.
Rankings are based on our independent testing methodology. Each guide applies the criteria described on that page, including relevant performance, privacy, product features, and value data. We may earn affiliate commissions from links on this page, which helps fund our testing — this does not influence our rankings.